
Direct-to-Film Printing: A Step-by-Step Guide for Beginners
Share
Are you new to the printing industry and want to learn about Direct-to-Film (DTF) Printing? You have come to the right place if you want to start a journey with DTF printing. We have prepared this step-by-step guide for beginners to master the art of screen printing and the Direct-to-Film Printing process.
This blog will help you through every step of the DTF printing process, choosing the right equipment to prepare your artwork and the benefits of DTF printing.
So, whether you are new to the DTF printing business, a start-up of a customized t-shirt business, or an art enthusiast, this blog will help you start your journey with DTF printing. Let’s step into the world of modern printing, starting with dtf.
Understanding Direct-to-Film Printing
Direct-to-Film printing is a new technique that uses a PET film ( a thermoplastic polymer resin with a coating that helps transfer designs), adhesive powder, a DTF printer, DTF printing ink, and a heat press machine to transfer designs into fabric or other materials.
And yes, you can choose fabrics as per your choice. Silk, polyester, cotton, or synthetic fibers, you name it. Versatility, ease, and durability; what else would anyone ask for in a single customized art?
Moreover, you can choose other materials like cups and ceramics.
Let’s dive into the factors which give DTF printing an upper hand against other techniques.
Benefits of DTF Printing
So, you have understood what DTF printing is, but you must be wondering why to choose DTF printing when there are many other printing methods. Let's look at some benefits that give DTF printing an upper hand against sublimation, vinyl, direct-to-garment, and screen printing.
-
Versatility
DTF printing gives you the option to choose a wide range of materials. You can consider any fabric, including silk, polyester, cotton, or synthetic fibers. Moreover, you can also try this printing on paper and plastic.
This material compatibility allows you to customize almost every piece of apparel.
Other methods, like sublimation printing, do not have these features. Sublimation printing works best on polyester-based materials or materials with a polyester coating. It can be done on other fabrics like silk, but there are many drawbacks like fading of the design.
-
Durability
As the ink and the design are embedded in the material itself, DTF printing is more durable than those techniques in which the ink only sits on the top of the material. For instance, techniques like Vinyl printing cannot stay fresh and will fade in some years.
The prints produced by DTF printing are vivid and intact even after numerous washings or exposure to harsh environments. The high-quality ink used in DTF printing is made to endure regular usage and tear pressures.
-
Cost-Effective and Cheap
DTF printing is very efficient in terms of material and inks. It produces the least wastage during the printing process compared to other techniques.
Moreover, DTF printing doesn't require transfer paper or other unique materials, which can cut material costs and the cost of the printing process as a whole.
In the case of other printing, the cost is much higher due to the astronomical prices of the equipment. For instance, screen printing equipment is more expensive than DTF equipment. The cost-efficiency makes this printing available at a lower price.
Suppose you are looking for customized art at a competitive and affordable price. You can visit our official website at trydtf, where we give out free samples for someone looking to start their journey with DTF printing.
Step-by-step Process of DTF Printing
Coming this far, you must be wondering how DTF printing works. So we have brought a step-by-step process of dtf printing.
-
Design the Artwork
First, you must show your creativity by designing the artwork for the project, which will be printed in a PET film. Just remember that your artwork has good quality with a resolution of at least 300 DPI.
You can use many tools for designing your artwork, including InDesign, Illustrator, Photoshop, and Sketch to design the best art.
-
Create a Print on the Film
Now it's time to prepare your print on the film. Load your DTF printer with the PET film, ensuring the printable side faces upwards. Remember to use high-quality printers. Press the Print Button.
Be careful while removing the print from the printer, as it might get smeared.
-
Spread the Adhesive Powder
In this step, a film with an image printed on is covered with a hot-melt powder. The powder needs to be applied to the wet print during printing.
To cover the wet ink on the web print, scatter ink over it and then seesaw back and forth. The surplus should then be carefully shaken off. Ensure that the powder is distributed evenly.
-
Melt the Powder
Once you are done spreading, you must melt the powder in place of the spread.
You should bake the transfer for approximately two minutes. Sometimes, DTF transfers need to be melted at specific times or temperatures. So, checking with the manufacturer can be a safe bet.
-
Prepare the Material
Choose the material for your printing. You can consider any material, as DTF provides many options, including clothes, bags, and most apparel made from any fabric. Make sure that your material is clean and does not have any wrinkles or dirt.
You are suggested to clean and iron the material for the best results.
-
DTF Printing Transfer Application
Now you are ready for heat-pressing. Place and align the DTF film with the printed image on the material. Use the heat press with the proper temperature and pressure.
Follow the proper guidelines as the temperature and pressure broadly vary on the material and ink.
You can store and use the film when needed, so you do not have to use the transfer as soon as you prepare them.
-
Peel the Film Off
After heat pressing and transferring, let the cloth and transfer cool off. After they are cool, peel off the film to reveal the vibrant and long-lasting artwork.
-
After Peel
Some printing equipment may require additional pressing for the best result. If the equipment does not need further processing, your work is finished after peeling the film off.
Viola, you have created the best artwork using DTF printing.
Equipment Needed for Direct-to-Film Printing
After learning the process of DTF printing, you must be excited and wondering what equipment and materials are required for the printing.
Here, we have mentioned the essential starter pack for DTF printing.
-
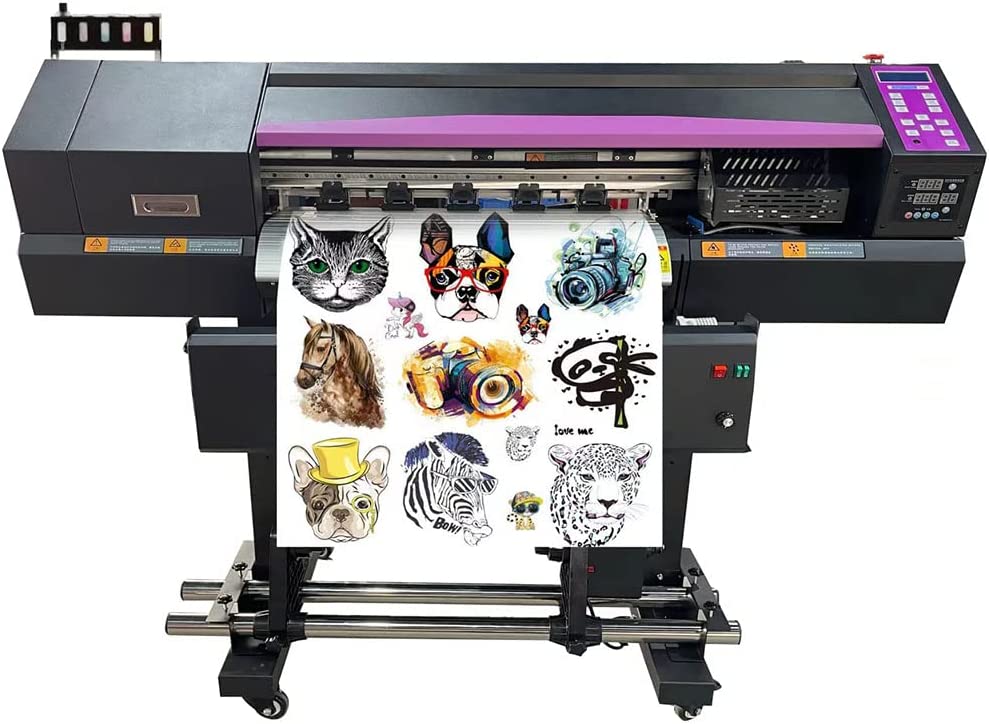
DTF Printer
DTF printers are the first equipment for DTF printing. These printers are used for printing films, so you will need a compatible DTF printer capable of printing high-quality images onto DTF film.
You can choose printers like a3 dtf printer and others from brands like Epson, Ricoh, and Canon, known for their high-quality products.
The most famous models of DTF printers are simple six-color ink-tank models like the Epson L800 and L805. These printer series are available in six different colors.
-
DTF Ink
DTF inks are special adhesive ink available in five colors: Black, White, Cyan, Magenta, and Yellow.
Likewise, there is another component known as ‘White Ink,” which is used to set the base for the design. The ink quality plays a vital role in the durability and the final quality of DTF printing.
Various water-based DTF inks are available in the market. So, choose the one that is most compatible with your printer.
-
DTF Flims or PET Films
DTF or PET films are heat-sensitive polyethylene terephthalate used to transfer design/ artwork from the printer to the material.
The DTF films are based on thickness and temperature (hot or cold peels). So, the film must be chosen based on the printer's compatibility.
-
Software
Likewise, DTF printing requires software to alter the artwork's final result and print quality. You can use InDesign, Illustrator, Photoshop, and Sketch, which are compatible with CMYK and white colors.
Free software is available for designing DTF artwork, but you should use paid software for the best results. Some of them even give you a free trial. So, test out the software and choose the one that benefits you the most.
-
Adhesive Powder
Moreover, you also require an adhesive powder or dtf powder for this printing. This white adhesive powder acts as a binding agent. It binds the ink to the material being used in the printing process.
DTF White hot melt powder is made from polyester, polyamide, EVA, polyethylene, thermoplastic PUR, and polyurethane resin.
-
Heat Press
Finally, you will need a heat press or a curing oven. This equipment will transfer the design from the DTF film to your substrate( material).
There are different types of heat presses based on the material and compatibility of temperature and pressure. These machines apply pressure and heat for a specific time to transfer the design.
In short, there are many pieces of equipment required for DTF printing. They are very expensive for purchase and maintenance. Moreover, it can be troubling to repair and maintain these tools.
Buying all the equipment might not be the best idea if you are a startup business or someone who wants a few DTF printings. If you do not have printers and other tools but still want customized art in your apparel or other materials, you can get the best DTF printing at trydtf.
Direct-to-Film Printing at trydtf
At trydtf, we transfer your plain and straightforward substrate and material to a fully customized piece of art.
Bring your t-shirts, mugs, caps, and more; we guarantee to return these items with versatile and high-quality direct-to-film transfers at the most competitive prices.
So, if you want to start your journey with DTF printing but are still considering if it is worth it, Trydtf has brought a solution for you. We offer free samples to get you started and make the process more convenient!
Please visit our site or contact us at trydtf to learn more about us and start your journey in the DTF printing industry.